-40%
NEW Internal Battery for Special Edition Zip Zaps Micro RC replacement 7AAAHR2A
$ 5.8
- Description
- Size Guide
Description
This listing is for an internal Battery for the Special Edition RC Zip Zaps by Radio Shack, it is a replacement for GP 2.4 volt7AAAHR2A
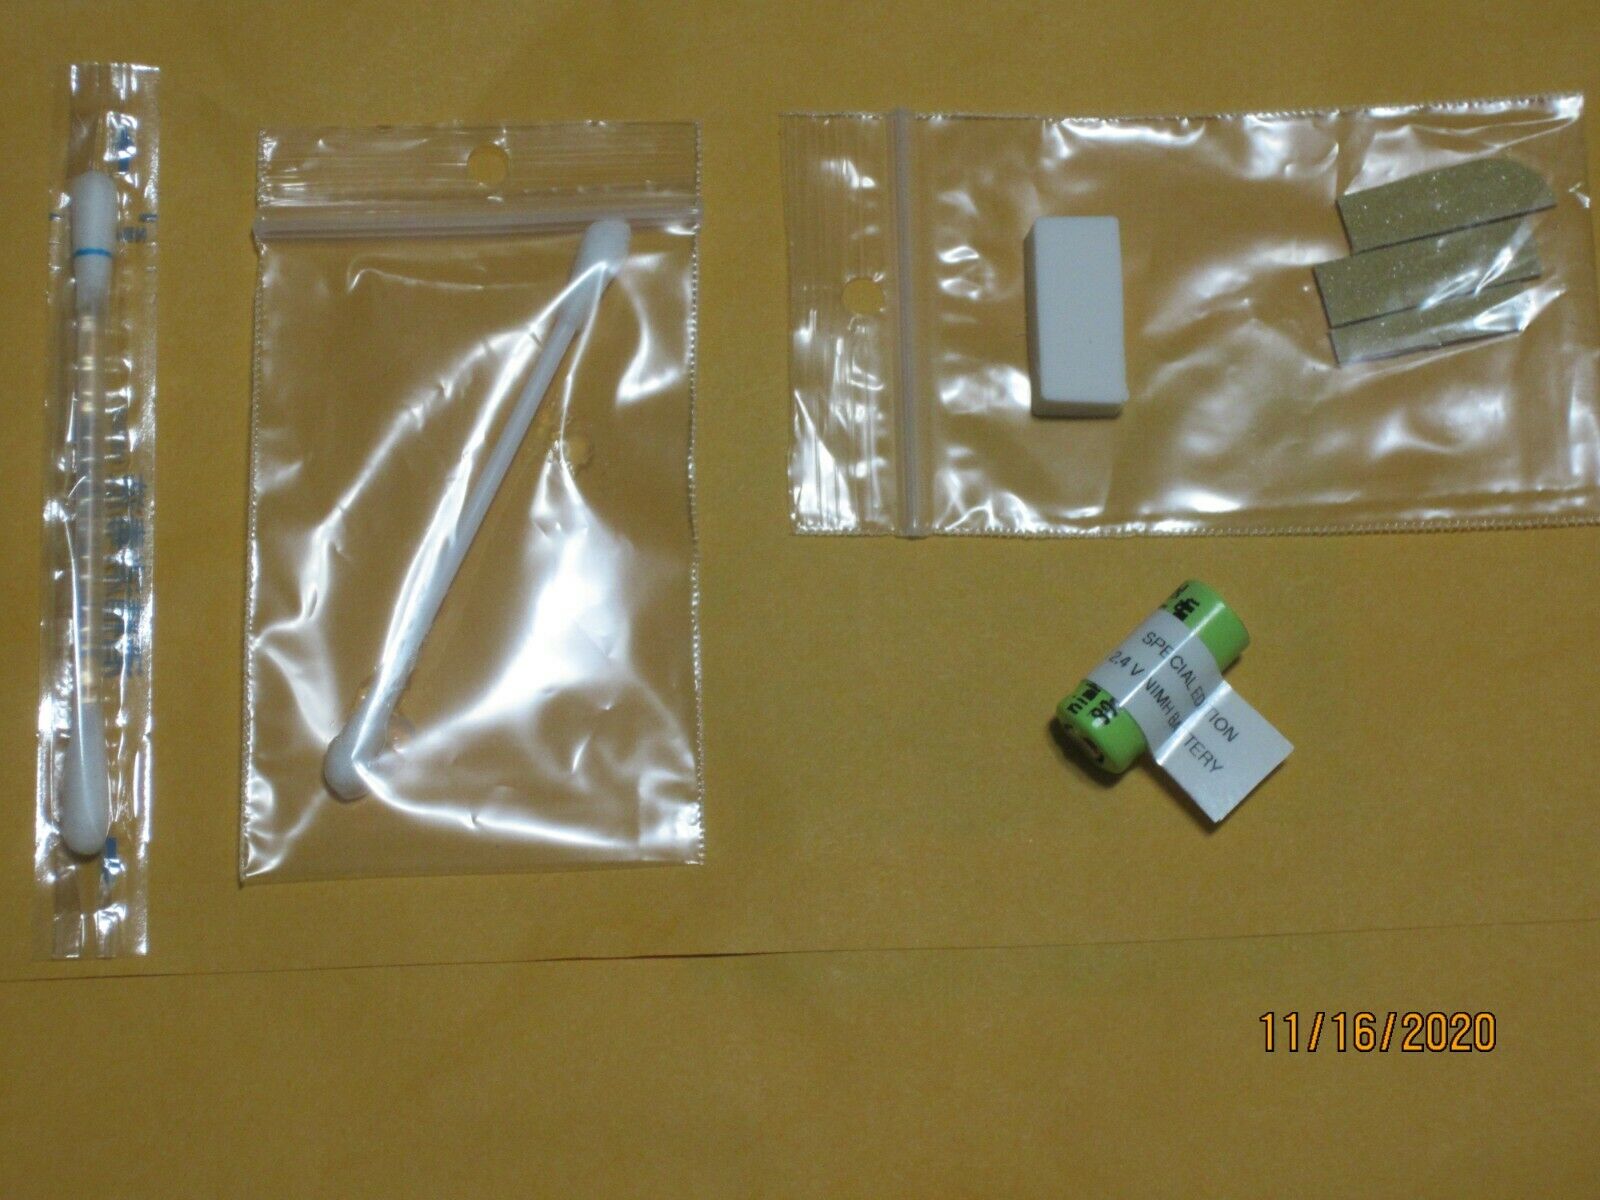
Includes (items as shown in pic. 1):
2.4 volt replacement battery for replacing GP 7AAAHR2A
emery boards cut to size
soft eraser
Isopropyl alcohol Q-tip
Specialized grease (contains Polydimethylsiloxane) - retards oxidation of the new battery and contacts.
Description:
If your Special Edition Zip Zap micro RC no longer charges or syncs with the controller. Your problem may be that the internal battery is corroded and does not charge.
With a new internal battery it could be as good as new.
Pic. 2 (not included) shows what the interior of your Zip Zap should look like to be compatible with this battery - ie please don't confuse it with the Regular Edition Zip Zaps.
Technician's Note:
These batteries have a slightly higher capacity than the original (80mah vs 70mah) and are consequently slightly longer.
Installation Instructions:
1) Turn the switch on the bottom of the car to "OFF"
2) Remove the 2 screws circled in green as shown in pic. 2 - The best size I have found is Phillips 000, about the same size used for eyeglass repair.
3) Carefully slide the PCB board forward and then pivot the PCB board, to revel the battery. Note that the positive end of the battery is circled in red as shown in pic. 3.
4) Remove the old battery, and clean the flat spring contacts in the car chassis if there is any oxide (looks like a green/white powder) or corrosion. We have included 3 emery boards, cut into 3 sizes (use the middle or large sized one) for this purpose.
5) Use the soft eraser to remove any oxide not visible to the naked eye.
6) Use the included isopropyl alcohol Q-tip to remove any debris on the flat springs. Activate the Q-tip by bending and breaking the Q-tip at the dotted blue line, the isopropyl alcohol will flow into the opposite end.
7) Move the wire cable that is behind the negative flat spring contact (pic. 7 to pic. 8) so that it is above the flat spring contact. This is done so that there is more room for the larger battery.
8) To improve the contact between the chassis and the new battery. Increase the pressure on the battery contacts, bend the flat springs. The easiest way I have found to do this is insert a small screwdriver between the flat spring and the chassis at the mid point and use a 2nd screwdriver and at the top of the spring push it towards the chassis. If done properly the flat spring should almost have a "U" or "V" shape. See pic. 9.
9) Coat the flat spring contacts and the battery ends with the specialized grease that we have included. This will retard the oxidation and improve the performance and life of the battery.
10) Insert the new battery with the negative end first, pushing against the battery so that the battery 'bulges' the side of the car chassis and can clear the positive terminal. If the battery does not clear the positive contact, use a small flat screw driver to move the flat contact against the side of the chassis and slide the positive end of the battery past.
IMPORTANT: Make sure that you install the battery with the correct polarity. The end of the battery with the RIDGE is the positive end. See pic. 10 battery end circled in RED is positive.
11) We used a battery label that sticks out to make installing the battery easier, now tuck the battery label tab out of the way, and reverse the steps to reassemble.
IMPORTANT: While reassembling make sure you tuck the wires leading to the steering coil - to the SIDE of the steering coil (as they originally were). If you jam the wires on top of the coil, you may cause problems with the steering function.
12) If the Zip Zaps Special Edition has not been used in some time you will also need to clean the bottom contacts of the car chassis shown circled green as shown in pic. 11. Use the corners of the small emery boards to scrape away any oxide, next the isopropyl alcohol Q-tip and finally protect it from oxidation with the specialized grease. When you are done the contacts should be shiny.
13) Also the tips of the contacts on the controller should also be de-oxidized, if it hasn't been used in some time. Use the mid or large sized emery boards on the tip of the contacts (where they make contact with the car chassis) circled in green as shown in pic. 12,... next use the eraser, alcohol Q-tip,... and finally the specialized grease.
Make sure you have 4 x "AAA" batteries for the controller and turn the car chassis to "ON"
Connect the chassis to the controller and the controller status light should turn red for about 2 minutes while it charges, after charging it should turn green.
If you get the amber (yellow) trouble light double check the connections between the battery and chassis, or the connection between the chassis and controller.
Nominal voltage should be 2.4 volts, after charging - saturation voltage will be between 2.7 - 2.8 volts.
These cells were custom manufactured for us in October 2020 (fresh !)
This item is also for sale at our retail location and may be removed at any time.
FAQ (Frequently Asked Questions)
Q.1. Is it hard to install this battery ? I've never installed an internal battery before.
A.1. It is fairly easy to install this internal battery. It requires no soldering and takes about 5-10 minutes depending on your manual dexterity and experience. We have included the instructions in this listing so you can gauge for yourself if it is in your comfort level.
Q.2 Do I need any special tools ?
A.2. The only tool you will need is a small Phillips screw driver (ideally 000 Phillips), we have included all other materials and parts you will need to install it and protect (specialized grease) the new battery.
Q.3. How does it compare to the original battery ?
A.3. It is the same chemistry (Nimh) as the original GP brand battery but has a slightly higher current 70mah vs 80mah. Due to this increase in power, it is slightly larger and the body sides may need to be flared out slightly when installing.
Track Page Views With
Auctiva's FREE Counter
